


One of the most stressful decisions you’ll make as a business owner is:
What tool should I use for _______?
Ohhhh man. I know this, because I’ve been there.
And I’ve used several business tools that were, um, less than impressive.
*Cue tech headaches, tool migrations, and crying into a tub of vegan ice cream*
Hello darkness, my old friend.
But the landing page tool I use?
It’s one of my FAVORITE business tools.
And, as you’ve probably guessed by now, it’s called Leadpages.
Leadpages has been KEY to me being able to:
- Grow a five-figure email list (and have five-figure months from my business as a result). You’ve gotta get people to opt in if you want them on your list. And creating a gorgeous, effective landing page is KEY to that process.
- Get awesome conversion rates. Up to 87%! We’ll talk about making your landing pages convert more a bit later.
- Save time on landing page creation. Because it’s SO. DAMN. EASY. and integrates with my email marketing software, ConvertKit.
The landing page we’re talking about today advertises my free course, Make Money Freelance Writing.
Here are the stats for the landing page in Leadpages (I’ll show you a picture of the page in a minute!):

That second column of numbers is total conversions – the number of people who opted in for the free course.
(I recently started tracking conversion rates of YouTube vs. blog, so that’s why I have two of the same landing page.)
You can see that it has resulted in 9,885 total new email subscribers.
And that the page is converting at 55% for blog and general traffic / 70% for people who are directed to the landing page from my YouTube channel.
Pretty good, if I do say so myself.
Now, before we jump into the tutorial, here are a few reasons I LOVE Leadpages and highly recommend it:
- Easy-to-use drag-and-drop builder. Zero coding required.
- A shitload of templates for all kinds of pages. Everything from webinars to eBooks to videos and beyond!
- Easy integration with ConvertKit, my favorite email marketing software. Works with other email marketing apps too!
LeadPages is like, the Rolls Royce of landing page software – without a crazy, make-you-shit-your-pants price tag!
Click here to follow along with me in the LeadPages tutorial as you create your own landing page (and claim your free trial!).
Don’t put this off – every day you wait, you could be missing out on email subscribers and business growth!
Plus, you’ll need to be inside LeadPages to get the most out of this tutorial.
So, go ahead click here to head over to LeadPages, and let’s get started! 🙂
LeadPages Review and Tutorial: How I Built a Landing Page That Got 9,885 Email Subscribers/Conversions
(Clicking the affiliate link above or any Leadpages affiliate links in this blog post supports my blog, and it doesn’t cost you anything extra to use. I only recommend LeadPages because, um, I’m basically obsessed with it. I appreciate the support SO much!)
First things first:
You need your big-picture strategy to be ON POINT to get lots of email subscribers and a high conversion rate.
That means doing stuff like:
- Using free content to build your authority on your niche topic – If you write a bunch of awesome blog posts about Chihuahua training and then create a lead magnet about golden retrievers, you’re doing it wrong. Focus on one specific niche topic. The blog post you promote your lead magnet in should be DIRECTLY related your lead magnet topic.
- Sending RELEVANT traffic to your landing page – If you’ve got a blog post about advanced electric guitar techniques, don’t try to get those people to opt in for a beginner electric guitar freebie. Not gonna happen – because it’s not relevant to them.
- Creating SUPER valuable lead magnets – Don’t make people regret giving you their email address. The lead magnet I’m talking about in today’s blog post is a free course I created. Free courses are great for building trust and giving people lots of value, but you could also do a video training, a checklist, etc.
Also, realize that some of the people who opt in will unsubscribe.
Shit happens.
(Note: Of the 9,885 people who signed up for my free course, about 3,000 people have either unsubscribed or been purged from my list. This may happen to you too!)
Unsubscribes happen with pretty much all lead magnets / landing pages, so don’t be mad at it!
In fact, unsubscribes are good, because it means you’re repelling people who aren’t going to want to work with you anyway. 🙂
Now, let’s jump into the tech tutorial, shall we?
After we’re done with that, I’ll talk about this landing page more from a sales perspective and WHY it resulted in so many opt-ins.
(Note: The images in this blog post represent my stats and the way that the landing page looks as of the day of writing this blog post. I may update the way this landing page looks in the future due to my business rebrand. So if the live page looks different when you read this blog post, that’s why!)
How to Use The Leadpages Drag-and-drop Builder
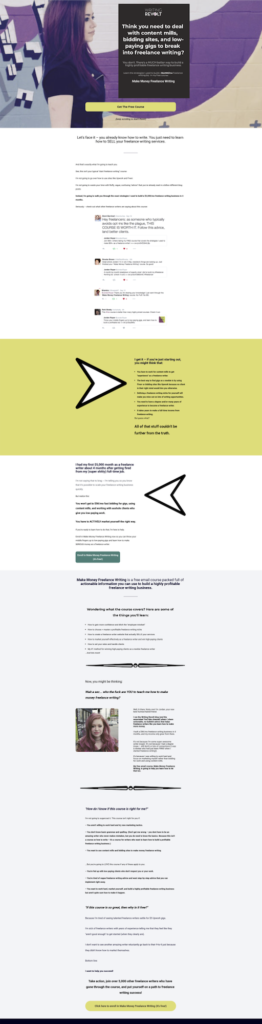
Here’s the Leadpages landing page we’re talking about today:

No need to reach for your microscope!
We’ll look at some zoomed-in sections too.
Now, I’ve gotta say, I don’t remember if I used a template for this particulr page. It’s been around a while.
But Leadpages does have TONS of templates to choose from, and you can organize them by how well they convert! (Just one of the many reasons I LOVE LeadPages. I use their templates all the damn time.)
Here’s what their template library looks like, in case you were wondering:
What I DO know is that I used the Leadpages drag-and-drop builder to build this landing page, which looks like this:
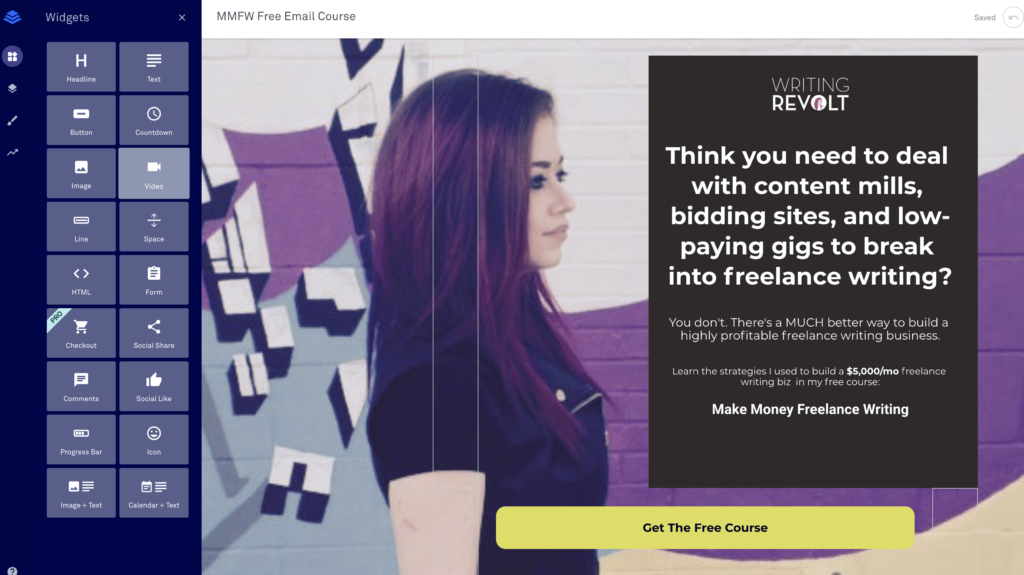
Let’s all pause for a moment to appreciate my sweet-ass faux leather vest.
You can see the widgets toolbar on the left, which is basically the panel for the things you can drag over to the landing page.
So if I wanted to add another image, I’d just drag the “image” icon into the page where I want to add an image, like this:
As far as editing the basics, like space around stuff and element colors, you just open up the Page Layout tool on the left, then navigate to the part you want to edit, like this:
Leadpages helps out by highlighting whatever Row/Column you’re hovering over in blue (so you can be SURE you’re editing the right thing!).
So, for this particular section of the landing page, you can see it’s pretty simple.
I went into Page Layout to edit the background to a picture of me.
Then, I have some basic text in the call-to-action box.
And a big yellow button people can click on to enroll in the free email course which I’ve set up to deliver with ConvertKit, my favorite email marketing software.
As far as the rest of the landing page, it’s just full of more simple elements I’ve dragged over into the builder.
For example, this section is text widgets and an image element on a yellow background:
It’s two simple columns (which you’d find in the Page Layout section in the left nav bar of Leadpages) and a big-ass arrow image next to a couple text elements.
Easy peasy.
Other basic stuff you will want to do when you create your landing page is add your logo (lots of templates have a place for it – you just click and upload your image) and make the colors match your brand.
That’s pretty much it.
Not nearly as scary as you thought, right?
(I actually aimed for this tech tutorial to be a lot wordier, but hey, if I can cover the basics quickly for you, that works too!)
Bottom line:
You can use the Leadpages Page Layout tool (for editing the foundational pieces of your landing page, like changing a section background) and the Widgets tool (for adding elements, like buttons and text), to create pretty much whatever you want!
And then, you can click your elements (text sections, buttons, etc.) to directly edit them, like this:
Remember, you can always start with a template.
Then, just plug in your content and images.
That’s what I tend to do, and it makes the whole process super quick and easy. 🙂
(This is an affiliate link, meaning I get a commission when you sign up with my link. But it doesn’t cost you anything extra to use, and I only recommend LeadPages because I use it and LOVE it. I appreciate the support!)
Okay, on to our next topic, which is…
How I Got So Many Opt-ins on this LeadPages Landing Pages (strategy, copy, etc.)
Leadpages is so easy to use that it’s pretty difficult to fuck up with the drag-and-drop builder.
It’s super straightforward, especially when you get in there and mess around with it for a little while.
However, a gorgeous/branded landing page in LeadPages is just one step in the process of attracting lots of email subscribers and creating a landing page that converts really well.
We’ve talked about the big picture strategy part some.
…Stuff like directing the right traffic to your page and building authority on your topic.
But now, I want to share a few quick (and super actionable/effective) tips for making landing pages that CONVERT:
- Use social proof.
You can see that my landing page has several testimonials, like these:
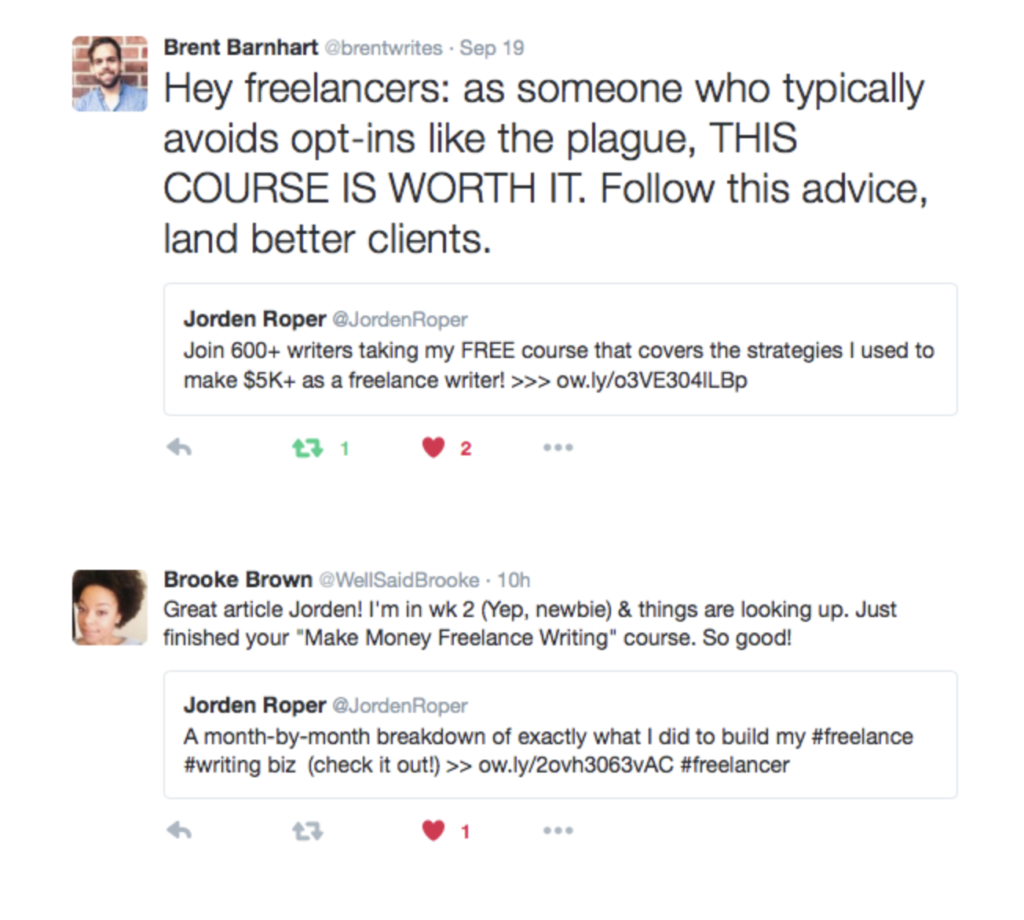
This kind of social proof works well because it builds trust.
People stop thinking:
Oh god. Another garbage “free course” that’s as fluffy as a stuffed unicorn toy.
And instead, they start to think:
Wow. Real people are backing this course/freebie. And on their Twitter accounts! It must be good.
That means more email subscribers for you, my friend.
Now, if you’re creating a new lead magnet, you may not have testimonials yet.
If that’s the case, make it your goal to collect some.
For example, you might email some of your students and ask for feedback.
Or, you can Tweet your course out like I did and screen grab positive feedback when you see it.
- Overcome objections.
When you’re creating a long-form landing page like this one, you have to ask yourself this question:
What would make people think that this might not work for them? What would their objections to clicking the opt-in button be?
For my landing page / freelance writing course, one objection is, “I don’t have a degree or years of experience.”
So, I overcome those objections by including this section:
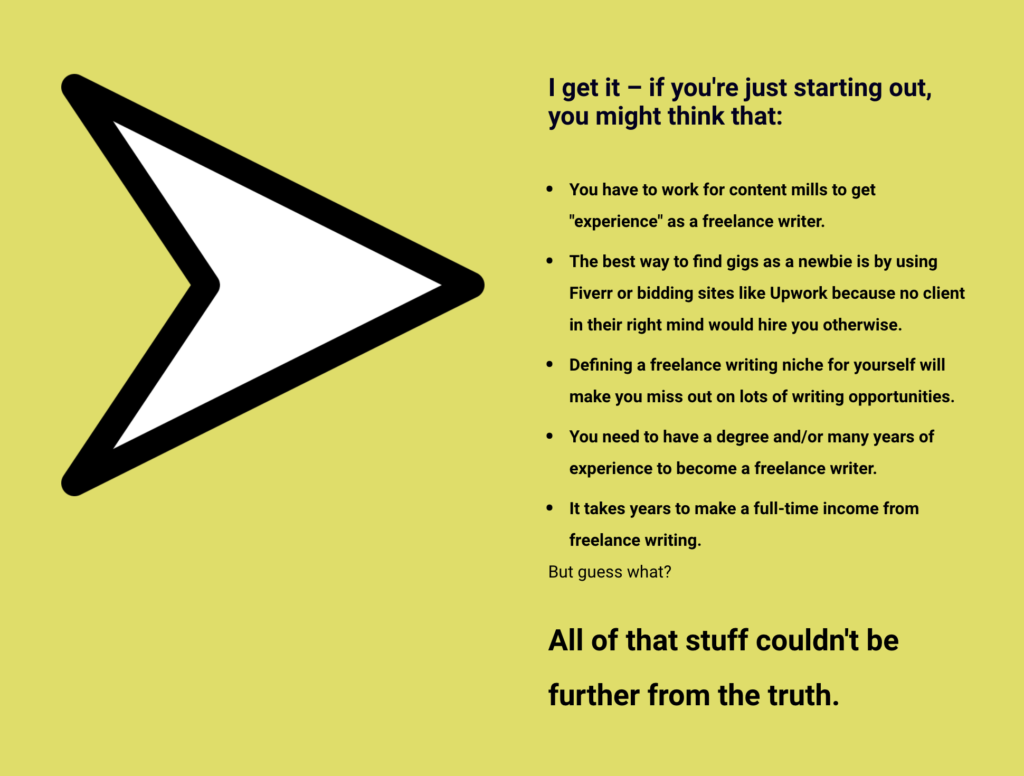
I don’t have a Bachelor’s degree (3-time college dropout here!), and I also didn’t have years of experience writing when I started out, so it made perfect sense for me to add this section in.
This is powerful stuff when it comes to taking people from the mindset of “this won’t work for me” to the mindset of “this can totally work, even for me, so I’ll opt in!”
And the latter is the mindset they NEED to have before they’ll be ready to take a free course like this one!
- Include multiple buttons if the user has to scroll for a while.
Think about it.
If YOU landed on a page this long…
…Wouldn’t you be a bit annoyed if you had scrolled to the bottom of the page, but the only sign-up button was at the top?
Yep.
It makes a difference.
That’s why I include multiple opt-in buttons on long landing pages.
My goal is to make it so that, the second the user decides that they want to opt in, they have a button to do so SUPER close by.
So, add those buttons, my friend!
And remember:
One of the best things you can do when writing landing page copy is put yourself in your reader’s shoes.
Ask yourself what their problems, struggles, wants, needs, and goals are (related to your lead magnet topic).
Then, use that information to make the reader feel like this when they see your lead magnet:
“OMG! This is EXACTLY what I need!”
One last point before we wrap up…
Do NOT create a shitty lead magnet.
Seriously. Your audience deserves better.
Plus, you’ll lose their trust if you deliver sub-par content, meaning they aren’t going to want to work with you / buy your products or services.
On the other hand, an amazing lead magnet will make your readers think:
“Wow! If the free content is this good, imagine how amazing the paid products/services must be!”
––––
I could go WAY more in-depth on this sales page strategy stuff, but let’s save that conversation for another day since this is a LeadPages blog post and not an in-depth sales copywriting guide.
Bottom line:
LeadPages is super easy to use, has lots of customization, and won’t cost you an arm and a leg.
High-converting landing pages are KEY to building your email list.
And building your email list is 100% necessary for growing a highly profitable creative business.