I have a confession to make.
I used to be a hot MESS when it came to creating a pro freelance writing invoice.
And when I started my business, I had no clue what to include in an invoice or how to come across as professional when I sent one.
It all seemed so overwhelming, and I’d ask myself stuff like:
Is there some kind of special program I need to use to make invoices, or do I just design the invoices myself? And what the hell do all these weird terms like “Net 30” mean? And how am I supposed to keep track of my biz finances?! Ugh.
I used PayPal to send invoices for just under a year.
And it worked okay.
I mean, it wasn’t anything special but it got the job done.
I was mostly just winging it while thinking, “Shit. I hope I’m doing this right.”
Before long, I realized I need to step up my invoicing game.
I’d seen some pretty cool-looking software.
But honestly?
That kind of stuff scared the SHIT out of me.
What I needed was something simple enough for me to use easily – but also robust enough for my growing business.
And then…
I discovered it.
The EXACT thing that would allow me to send a professional freelance writing invoice AND keep track of my business finances.
I like Freshbooks because it’s specifically for small businesses – you get what you need without all the complex, confusing bullshit that makes you want to tear your eyes out.
So, today, I’m going to show you how I use Freshbooks to create invoices (and I’ll talk about some of the other features too!).
Of course, you can use the same idea here to create an invoice elsewhere, but I’m covering Freshbooks specifically because that’s what I use and I loooove it.
How to Create a Pro Freelance Writing Invoice Using Freshbooks
First, you’ll need to head over to the Freshbooks website and create an account.
Once you do that and log in, you’ll be taken to the home screen. There, you can see a summary of your invoices/expenses + your outstanding invoice information.
Here’s what it looks like:
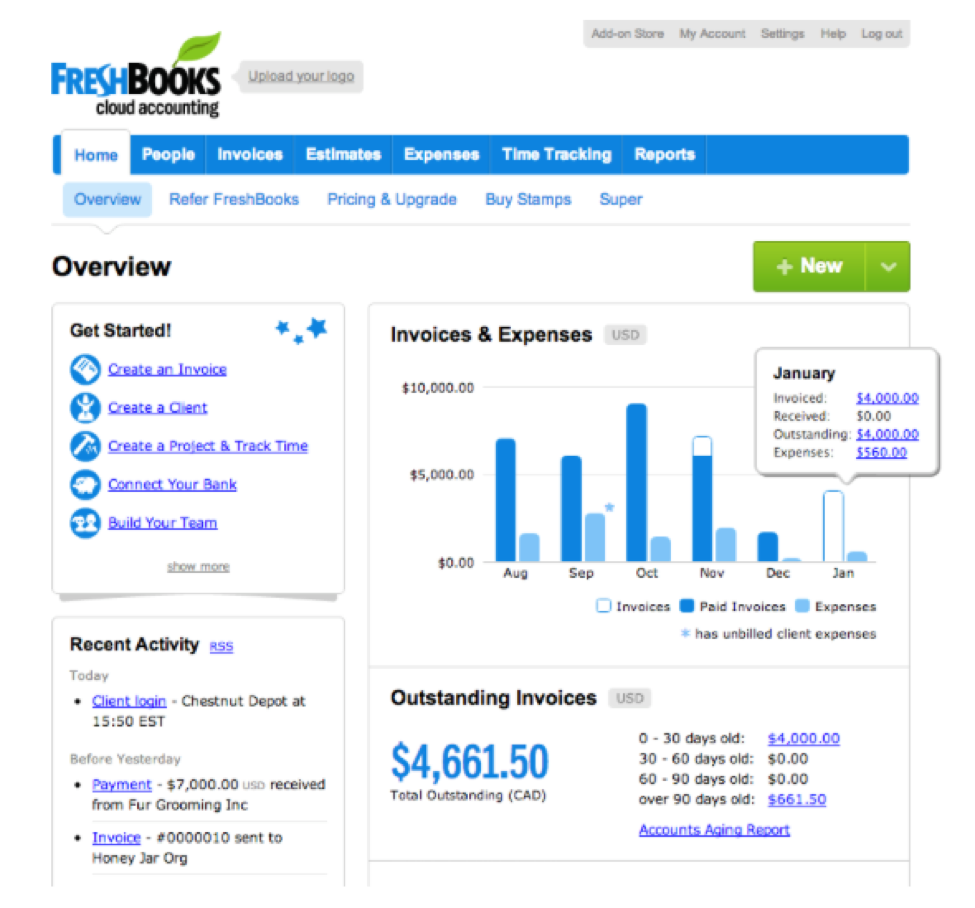
I could probably rave all damn day about how much I love this financial overview.
…No need to organize everything in spreadsheets – you can quickly see your income and expenses as soon as you log in!
But let’s stop right there and talk about HOW to create a freelance writing invoice before I go too cray cray over my obsession with the financial overview feature. 🙂
To start creating an invoice, all you need to do is click the little drop-down arrow in the green “New” box.
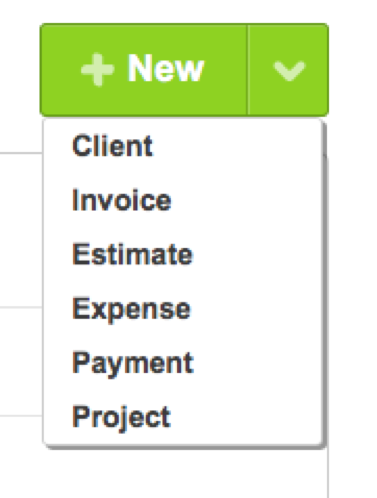
Then, you can click “Invoice,” and you’ll be taken to this screen:
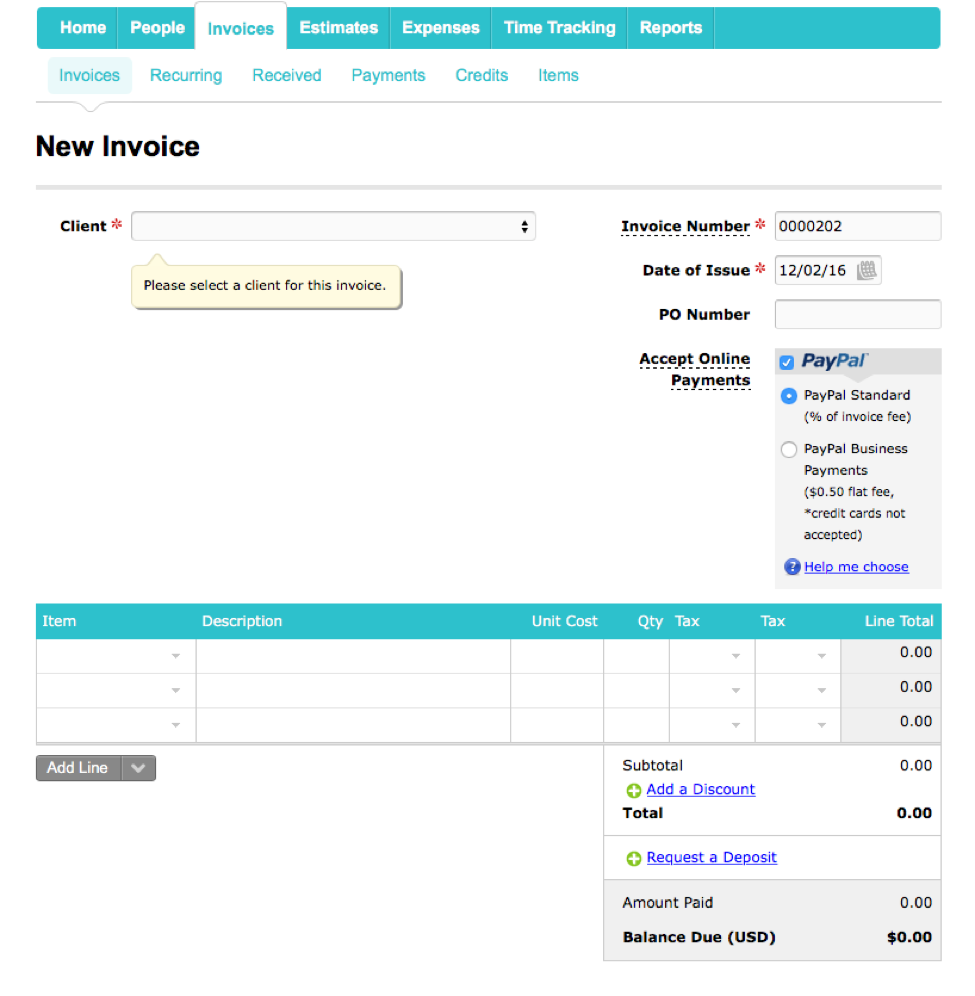
First, you’ll want to select the client to send the invoice to.
If you haven’t entered the client for this invoice into your system yet, just click the drop-down menu next to “Client” and then click “[new client].”

Then, you’ll see a “New Client” box pop up. This is where you can fill in all of the client’s info.
Now, you don’t necessarily HAVE to put everything in there.
For a lot of my clients, I just put their email address, first and last name, and organization name.
That’s all I usually need since they’re just paying the invoice online with PayPal most of the time.
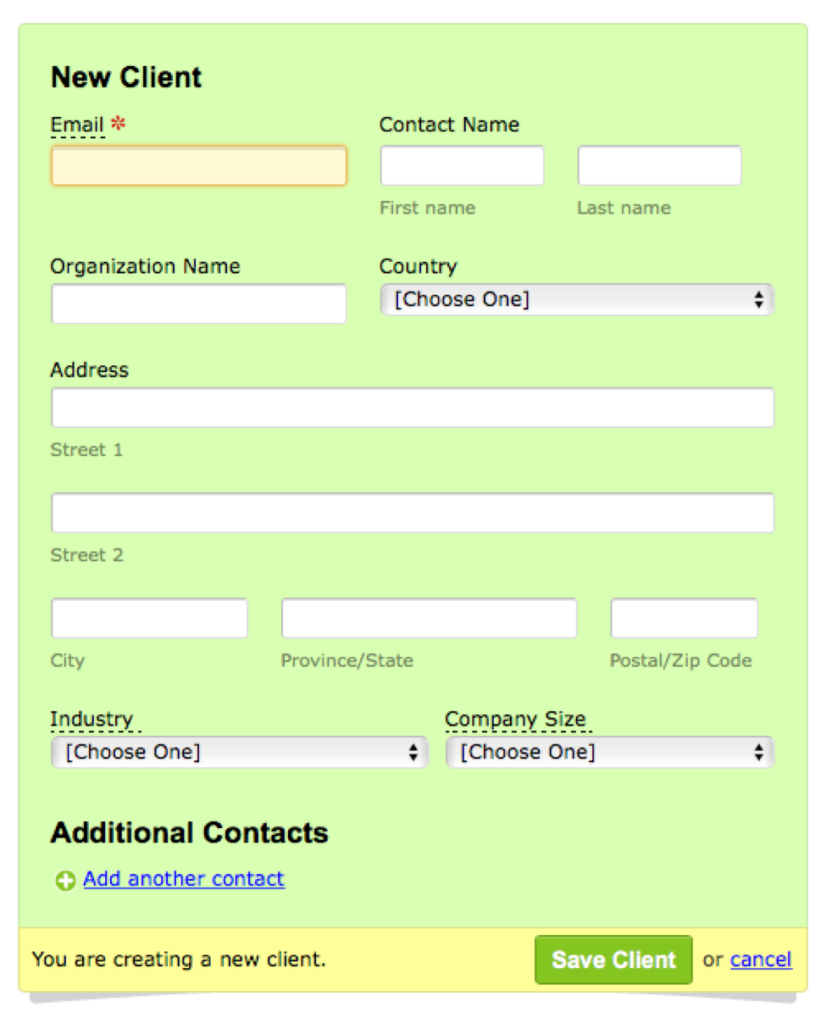
Once you fill this out, click “Save Client.” And don’t worry – you can always go back in and edit the client’s info later on!
You should see your freelance writing invoice updated with the client you’re sending it to.
Next, it’s time to fill in the item you’re charging for and the description of the item.
Now, this will obviously vary based on how you’re charging the client, what the client is paying for, etc. But for the purpose of this example, I’m going to tell you how I typically do it when I’m charging for a one-off blog post.
First, I type “Blog Post” in the “Item” field. Then, I type the title of the blog post into the “Description” field and the flat rate for the post into the “Unit Cost” field.
It ends up looking something like this:
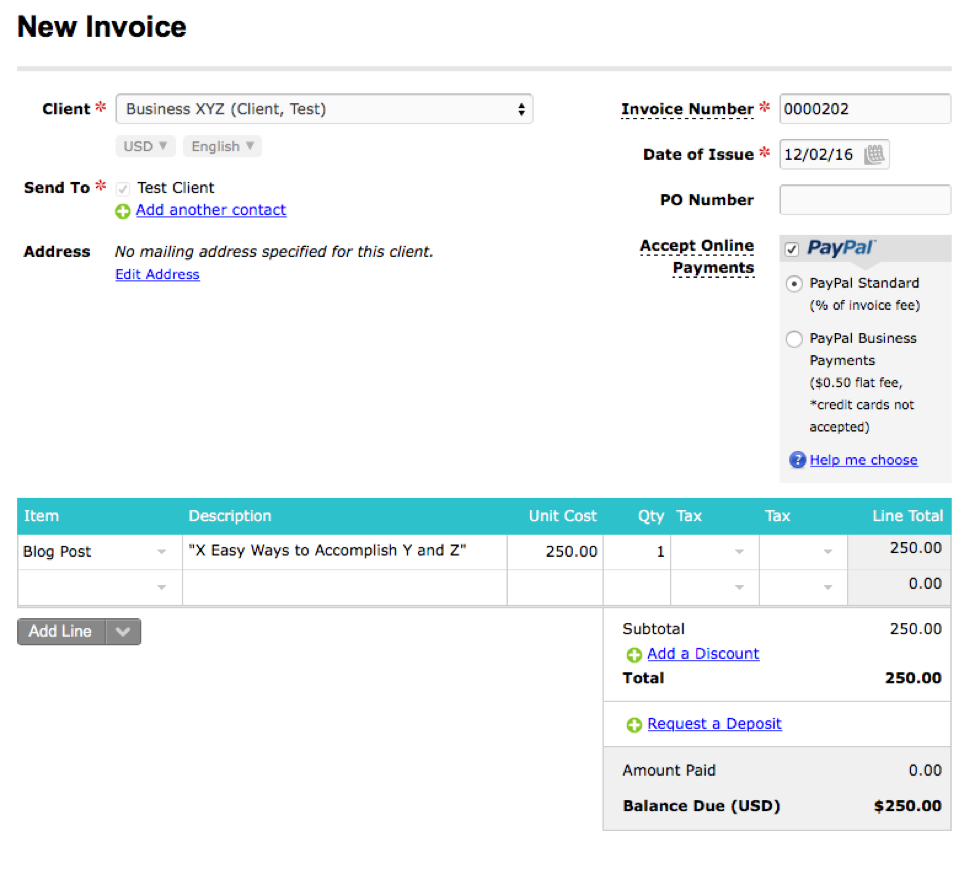
When you enter the unit cost, Freshbooks automatically calculates the total for the invoice. (This really comes in handy when you’re charging for lots of different things at once!)
Down below the main invoice, you’ll see two more text boxes: “Terms” and “Notes visible to client.”

I put the invoice due date + the payment terms in the “Terms” box, and I also add in a note thanking them.
That way, I’m making it easy for them to pay on time – the due date is right there.

Now, let me stop here for a moment and explain “Net 15” (because that’s something that confused me when I started out!).
It simply means that the client has 15 days to pay once they receive the invoice.
In the example freelance writing invoice above, I sent the invoice on December 2nd, 2016. So the due date ended up being December 17th, 2016.
If you want to give the client 30 days to pay, you’d say “Net 30.”
You get the picture.
(On a related note, make sure you let the client know about your payment terms + have them agree to those terms BEFORE you write a single word. The last thing you want is for them to be surprised about the amount of time they have to pay!)
So now, the invoice looks like this:
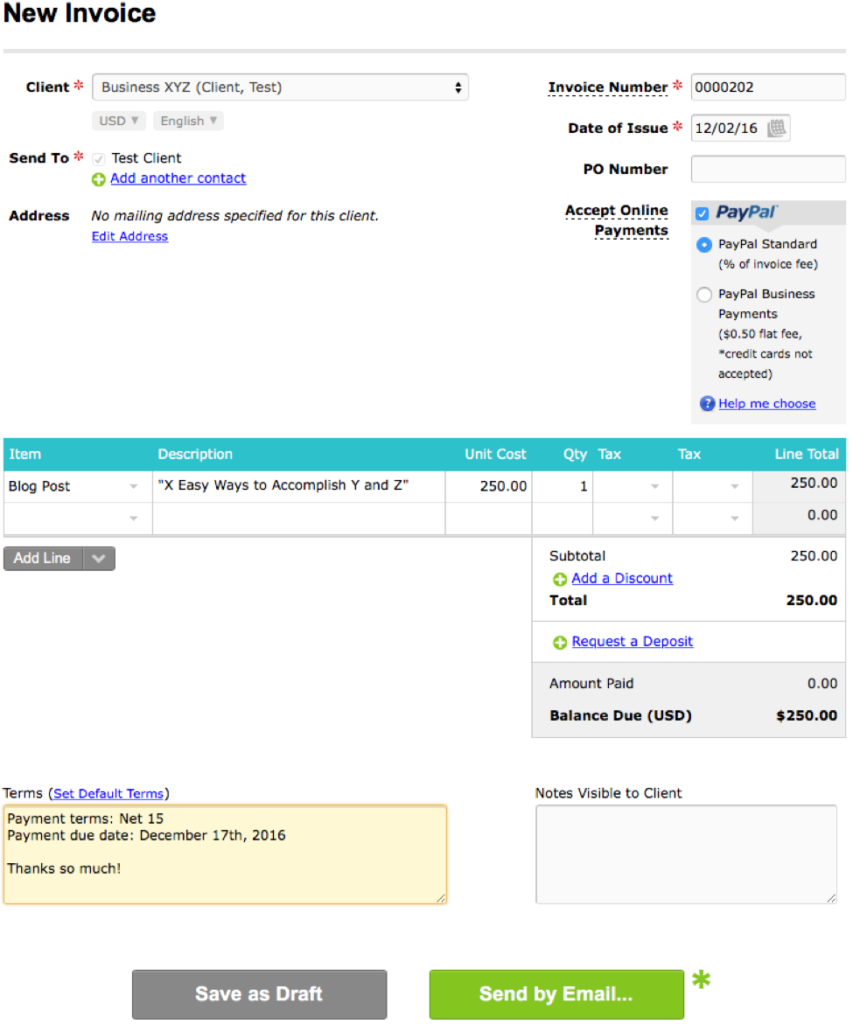
Click the green “Send by Email…” button at the bottom, and you’ll see a pop-up with a preview of what the invoice will look like to the client.
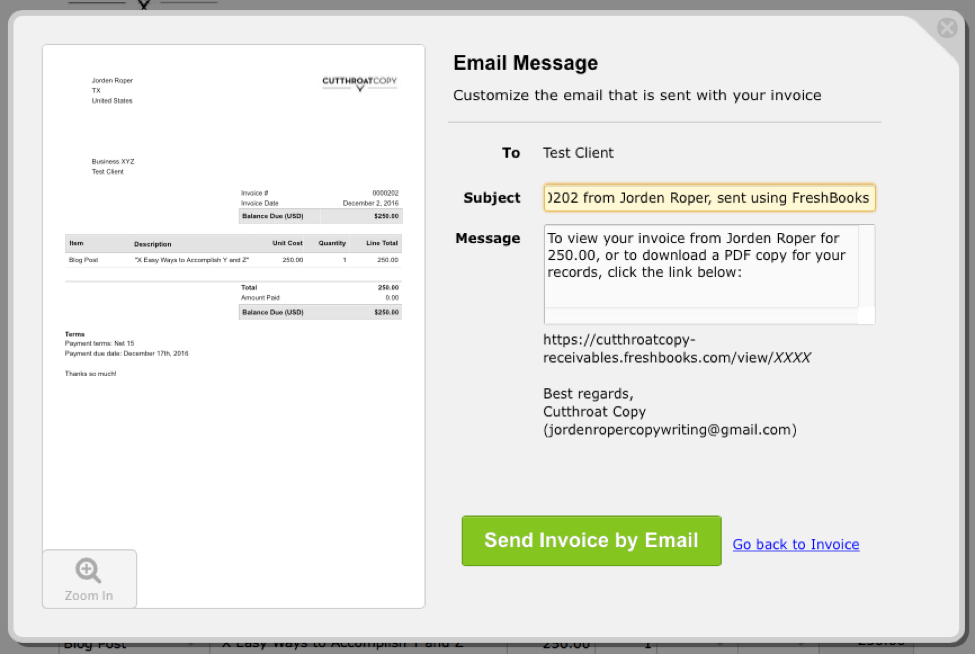
Use the “Zoom In” tool to look over your invoice and double-check everything one last time. When you’re ready, just hit the big green button to email the invoice to your client.
Want to find out when a client viewed one of your invoices?
Just look at the “recent activity” section on your home page in Freshbooks.
Or, click on “Invoices” in the navigation bar, and you can see an overview of which invoices have been viewed by your clients.
And that’s it!
Pretty simple, huh?
Why I Use Freshbooks Specifically
I’ve already covered a lot of the reasons why, but I wanted to break it down here again.
One big reason is because I’m SUPER disorganized.
Tax time scares me more than the thought of being crawled over by 1,000 bloodthirsty mutant tarantulas.
(Actually… I’m not sure it scares me THAT much. Pretty damn close though.)
Freshbooks helps with that in a BIG way by giving me an easy-to-understand view of my income + expenses in the dashboard.
And I don’t have to struggle trying to track all my stuff for tax time – it’s all right there.
On top of that, Freshbooks invoices look professional, and the software itself is really affordable and easy to use.
Seriously. The $19.95 per month I pay is WELL worth being able to easily send sexy invoices fast and ACTUALLY knowing what the fuck is going on with my business finances. 🙂
(Click here to try Freshbooks free for 30 days!)
Now, you might have some more general questions about creating a freelance writing invoice.
I’m going to give you as many tips can think of, but feel free to ask away in the comments section of this post if you have a specific question you need help with!
Tips for Creating a Professional Freelance Writing Invoice
Brand your invoice.
The main way I brand my invoices is by including my Cutthroat Copy logo and a simple “Thanks so much!” note to clients.
To upload your logo in Freshbooks, hover over the logo at the top of the page and click “Upload your logo.”

Then, you can put your logo at the top of your invoices, like this:
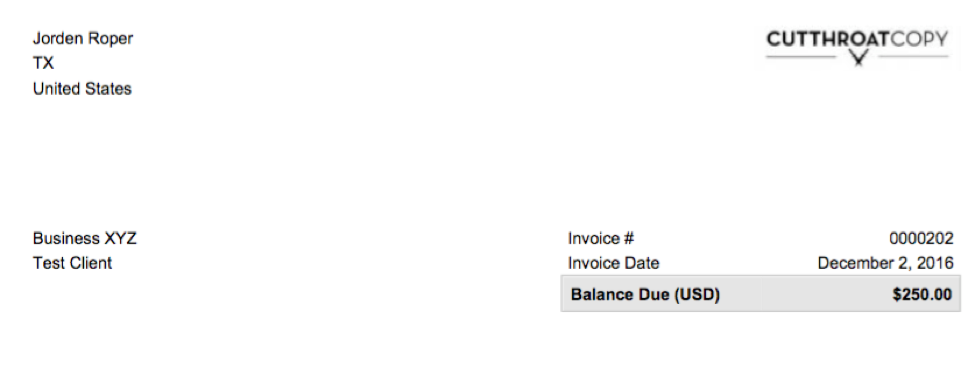
Of course, this step isn’t 100% necessary, but it does add a professional and personal touch to your invoices.
Break down the details.
For example, if you charge per word for a project (even though you probably shouldn’t because per-project rates are better!), it’s a good idea to break down the details in the “Description” box, like this:

Or, if you worked on a big copywriting project and charged by the page, you could break it down by Home Page, Contact Page, Services Page, etc. Then, you’d put the fee for each page separately.
Splitting it up this way helps the client see a breakdown of exactly what they received, and it helps you keep track of what you’ve done.
Of course, you may not need to break down certain things.
But it’s a good idea to do it if it makes sense for your project/business and helps clarify what was completed.
State your policies upfront (and make sure clients agree to them!).
I already talked about this a little, but I’m going to say it again because it’s THAT important:
You need to make your policies clear upfront – the client shouldn’t be surprised by your payment terms, the due date, your rates, etc.
Let them know your terms before you ever start writing for them, and make sure they agree.
For example, when I start working with a new client, I typically send them something like this:
“I invoice with Net 15 payment terms upon project completion.”
Then, I go on to clearly define what “project completion” is when they work with me – most of the time, it means they get up to 2 rounds of revisions.
You may also want to mention your late fee policies, acceptable forms of payment, etc.
…Just anything the client needs to know so they’re clear on how to work with you + you can avoid conflicts with them down the road.
Proofread and double-check your math – every damn time!
Seriously – it only takes seconds to proofread your invoice and double-check your math!
(You know, so you don’t accidentally call the client the wrong name or send an invoice for $3,000 instead of $300. Yikes.)
By doing so, you can feel confident knowing you’ve sent the client an invoice you can be proud of and, more importantly, an invoice that’s correct.
Of course, we’re all human, and everyone makes mistakes sometimes.
But you can often cut down on those mistakes with a quick second glance at your invoice.
…So, what do you think?
Do you have any questions about how to send a freelance writing invoice? Ask away in the comments section!
(And click here if you want to try Freshbooks free for 30 days!)
Note: This blog post includes affiliate links for Freshbooks. But it’s not just some random bullshit that was pitched to me to endorse (because that’d be gross). I use it personally, and I love it! Also, I’m not a financial expert and this post shouldn’t be taken as financial or legal advice – everyone’s invoicing experience will vary a bit based on their clients + biz!

