


The following is a guest blog post about managing your freelance finances by Carter Kilmann. Disclaimer: This article is for informational and educational purposes only and does not constitute legal or financial advice and does not establish any kind of client relationship with me or the writer. I am not liable or responsible for any damages resulting from or related to your use of this information.
The thought of managing your freelance finances can be overwhelming if you’re not a numbers person or if you’ve never been too keen on keeping your money organized.
But it’s not as tricky as you’d think. With a few repetitions, your business finances will be organized and optimized.
Why does that matter?
Because your finances determine your business’s long-term success.
If you can’t stay afloat financially, you can’t expect to become a full-time freelance writer.
On top of that, if you’re relying on your writing to make money and support your lifestyle, you’ll need to save to reach your life goals.
If you avoid managing your finances, how will you ever know if you’re on course to accomplish your goals – like retiring early or traveling the world?
Money isn’t made of trees, nor does it grow on them.
(Fun fact: it’s made of cotton and linen.)
Lastly, by maintaining your books, you gain a financial perspective that helps you decide what kind of business moves you can make.
For instance, if you want to know the financial effects of raising your rates, you’ll need to know how far your current rates are taking you. You’ll need to compare your income from your current rates against your expenses.
The only way to do that is to create a budget, a key component of sound financial management.
Long story short, your finances are integral to your freelance business’s success.
So, how should you go about organizing and managing them?
Buckle up, here’s everything you need to know.
Freelance Finances: The Ultimate Guide to Managing Your Money
Your freelance finances are supported by four pillars:
- Invoicing
- Budgeting
- Saving & investing
- Reinvesting in your business
If you want freelance writing to not only be a viable business but also an income-generating machine, you’ll need to establish and erect these four pillars.
Speaking of income, let’s start with the greatest part of finance: getting paid.
1. Invoicing
As a business, your job isn’t finished when you send a post to a client or publication. You need to make sure you get paid, especially if you don’t charge an upfront fee.
That’s where invoicing comes into play.
Invoicing is the process of billing your clients for the work you’ve provided.
If you want other businesses to take you seriously (and pay you on-time), your invoicing process must be clean and timely.
That means all of your invoices should consist of the following:
- Your business’s contact info, such as name, address, phone, and email.
- Your client’s contact info
- A line-by-line overview of your services and charges
- Payment terms (more on this later)
- A due date (i.e. your client’s deadline for paying you)
Here’s a basic example:
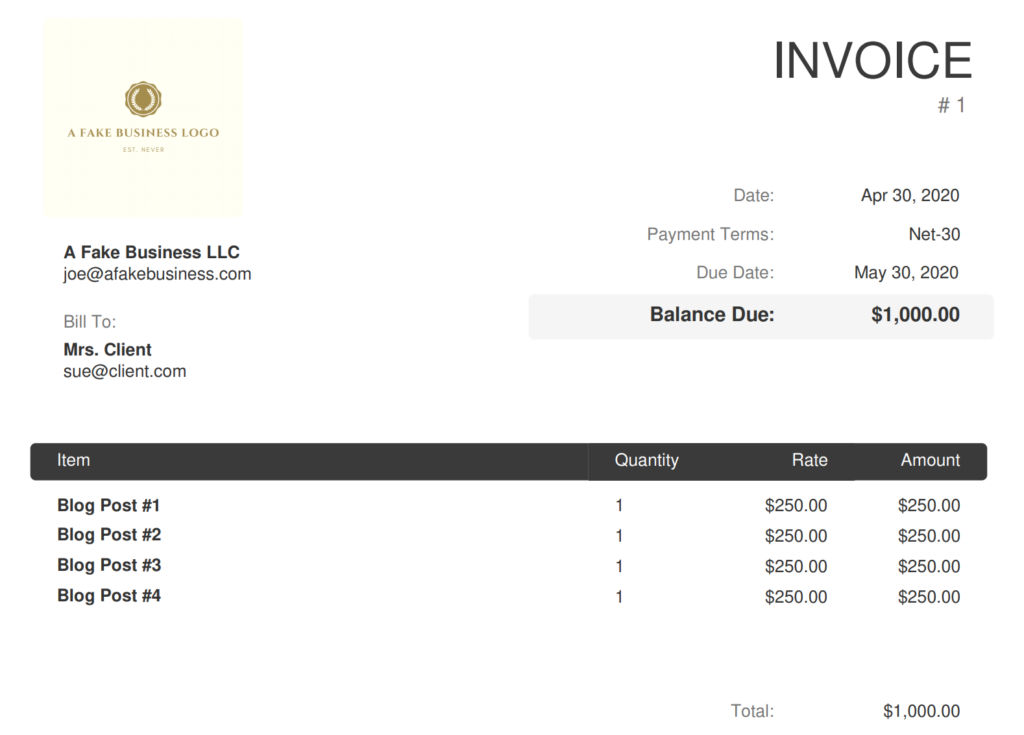
This is what a standard invoice looks like. Learn more about how to create a professional invoice here.
Standard Payment Terms
In general, net-15 and net-30 are the standard payment terms you’ll encounter.
While these might sound fancy, these labels just mean that the buyer (in this case, your client) will pay the invoice’s “net amount” (the total amount owed on the invoice) within 15 or 30 days after receipt of the invoice.
Again, it’s just a quick way to reference payment deadlines.
Yeah, I know, accounting-speak is pretty lame – but knowing the language of business makes you more credible as a business owner.
Fees
You should keep the following fees in mind when you set your rates and payment terms:
- Processing fees
- Late fees
- Kill fees.
Many platforms, such as PayPal, charge processing fees. For example, PayPal charges you each time a client completes a translation (i.e. pays an invoice).
Their fee?
2.9% of your total bill plus $0.30.
So, if you send a client a $100 invoice, PayPal’s cut will be $3.20 ($2.90 + $0.30).
I think you can guess what late fees are.
As you’d expect, late fees are penalties for missing a payment deadline.
Late fees incentivize clients to pay you on time, every time.
From a logical perspective, they make absolute sense.
If you miss a rent or credit card payment, there’s a penalty. You agreed to make a payment by a certain date every month, and you didn’t. So, there are consequences.
…Businesses should also be held to this standard.
Kill fees are your mechanism for ensuring you get paid even if a project falls through.
For example, let’s say a new client wants to build-out their blog.
To help them do so, you’re tasked with writing five blog posts that will serve as the new blog’s base.
You’re pumped. You cruise through two posts, and you’re halfway through your third. It’s your best one yet.
…Except, your client changes their mind.
“We miscalculated our budget. We don’t have the funds to start a blog right now.”
And then, they have the nerve to say they won’t be paying you for your work since it’s an incomplete project.
Here’s where the kill fee comes into play.
If a kill fee (or some other stipulation about getting paid for incomplete work) had been included, you’d still make money for the work you provided.
Kill fees save future-you from frustrating, uncomfortable situations.
Now that you know about the wonderful world of fees, you’re ready to explore invoicing tools.

Invoicing Tools
You’ll find tons of invoicing software and bookkeeping platforms out there, such as PayPal, Veem, QuickBooks, and FreshBooks.
PayPal is very common, and most businesses will be comfortable using this platform to pay you.
But, as mentioned above, PayPal charges processing fees. These costs add up.
If you’re like me and hate spending money on processing fees, consider other platforms like Veem. They don’t charge you anything to bill your clients.
It’s not as popular, so, in all likelihood, you’ll have to convince your clients to sign up. But it’s free, so it shouldn’t be a hard sell.
QuickBooks and FreshBooks are two more platforms that have invoicing capabilities, and they also offer a broader range of services like bookkeeping, reporting, and tax estimates.
So, if you’re open to a monthly fee, you can use these platforms to simplify your money management responsibilities.
Related Reading: The Ultimate Guide to Creating Professional Freelance Writing Invoices
Is it worth creating your own invoices?
It’s your business and your time, so deciding whether to create your own invoice templates and track payments is a business decision.
That being said, every second you spend updating invoices, tracking payments, and filing is a second that could be spent elsewhere on money-making tasks – like writing.
While most accounting tools and services cost money, the trade-off is peace-of-mind and additional time for writing.
2. Budgeting
Yep, the “B” word.
I know what you’re thinking, and yes – you really need to budget if you’re going to make a living freelance writing.
As a freelancer, you don’t have the luxury of a predictable monthly income. Your finances are messier.
…A budget cleans up that financial mess.
While invoices track your income, budgets track your expenses.
This is important because, if you don’t know how much you’re spending, you don’t know…
- Your net income (and how much you can save)
- How much money you can spend on personal and business expenses
- If you’re on track to reach your financial goals (and life goals)
In short, if you want to be a badass business owner, you have to be a badass budgeter.
Budgets expose bad habits and set realistic thresholds that enable you to stay in your financial lane.
Freelance writing doesn’t require much overhead (i.e. business expenses), so your net income is mainly driven by your personal expenses.
To track your expenses, you have two options: make your own budget (the DIY method) or utilize a budgeting app.
Let’s explore both options so you can decide which is best for you.
Option #1: The DIY Budget
This is way less daunting than it sounds.
It’s not like a DIY kitchen sink installation.
Creating your own budget is free and won’t ruin your home’s plumbing.
I don’t have a psychological study to prove it, but I’d argue that you’re more inclined to follow a budget you create. I feel more incentivized to stay within my limits knowing that future-me will check in on my progress each month.
And it sucks to disappoint future-me.
In four simple steps, you’ll construct an insightful budget in Excel that’s easy to update each month.
DIY Budget Step #1: Consolidate your expenses
Do you want the good news or the bad news first? Since you can’t actually answer that question, we’ll start with the bad news (I always prefer the bad news first).
The bad news: We have a ridiculous number of ways to pay for stuff. Credit cards, debit cards, Venmo, Cash App, PayPal, and regular cash (if you even use that relic anymore).
The good news: Thankfully, most of these payment methods are digital – so our transaction activity is easy to download and consolidate.
To consolidate your expenses, you’ll need to download your purchase history. We’ll focus on your expenses over the last three months to establish a reliable average.
Log into your bank or credit card provider’s website and look for something along the lines of “Activity” or “Transactions” or “Activity & Statements.” You’ll see a link to download activity on this page. Click download as “Excel” or “CSV” (comma separated values).
It should look something like this:
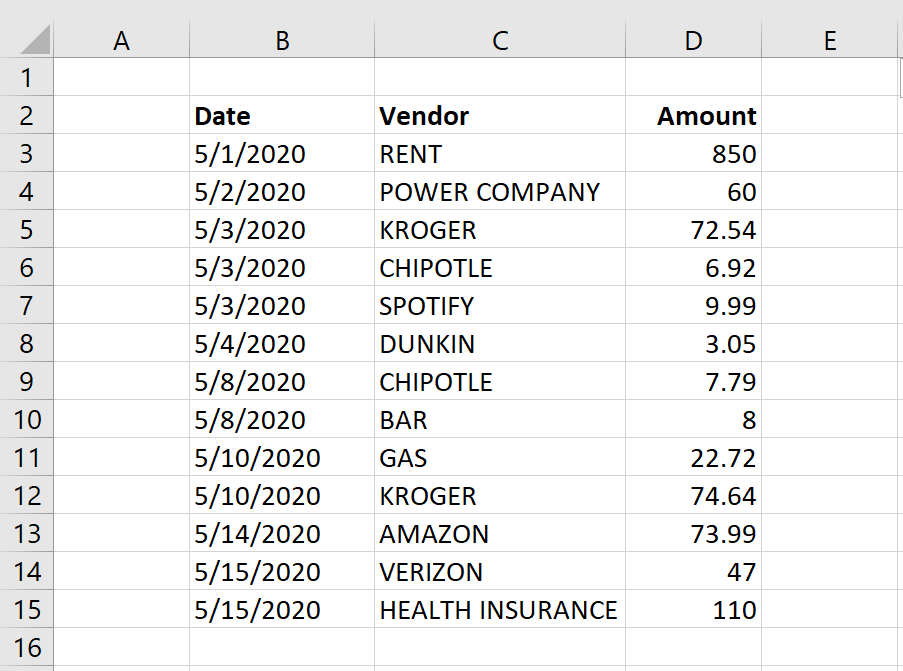
Life is expensive, so your list will likely be longer (this is just a basic example).
It might have other fields (like time or card number), but you only need the date, description, and amount.
You’ll need to repeat this step for each of your active accounts (credit cards, debit cards, Venmo, etc.).
Download your activity from each account and copy and paste everything into one spreadsheet.
Once your budget is created, the most time-consuming step will be going site-by-site to download your transaction activity.
…Which, honestly, doesn’t take that long in the grand scheme of things.
Remember, you need to monitor and track your expenses if you want to be a legit, badass business owner.
It’s worth the time.
DIY Budget Step #2: Categorize your expenses
Now that you’ve got all of your expenses in one place, it’s time to categorize them.
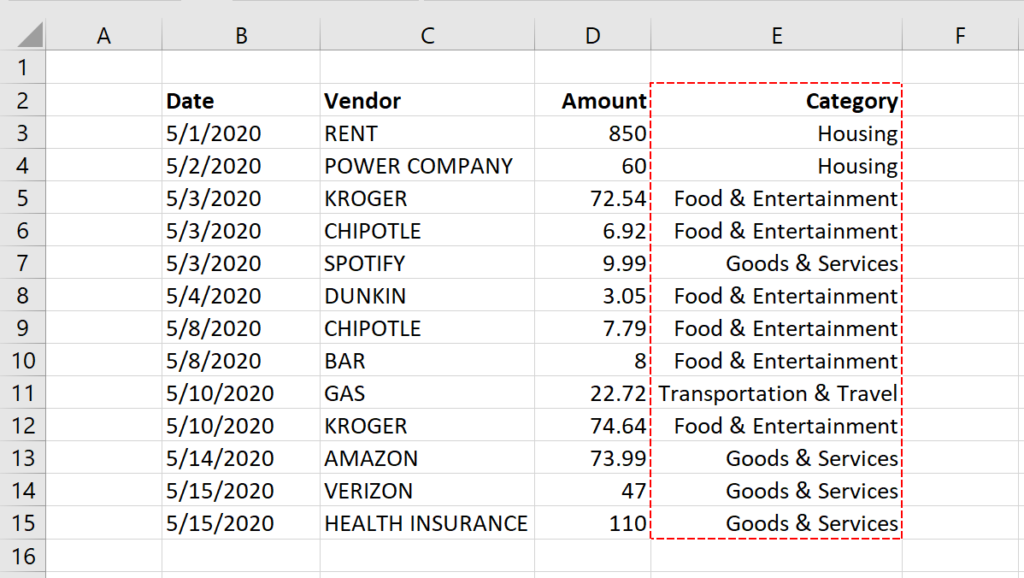
Remember, it’s your budget. You can use whatever categories you please, but here are five standard ones.
- Housing: rent, utilities, home repairs, etc.
- Transportation & Travel: gas, rideshares, parking, hotels, airfare, etc.
- Food & Entertainment: meals, groceries, alcohol, concerts, events, etc.
- Goods & Services: furniture, clothing, subscriptions, haircuts, insurance, etc.
- Miscellaneous: anything that doesn’t fit into the previous categories
If you have outstanding loans, you can either create a separate category for them (e.g. “Debt”) or lump them into an existing category (e.g. mortgage payments could be included in “Housing”).
Go line-by-line and label each transaction, like this:
IMPORTANT: Track your business expenses (save your receipts) and keep them separate from your personal expenses (i.e. in a separate tab). You can scan or take pictures of physical receipts. Store everything in a desktop folder.
You’ll avoid agonizing headaches once tax time comes around.
It’s smart to familiarize yourself with common small business tax deductions such as home office expenses or educational materials.
DIY Budget Step #3: Create a summary table
For a clear overview of your spending, you’ll need to create a summary table. On a separate tab, list your expense categories in one column. The row above these categories will represent each month.
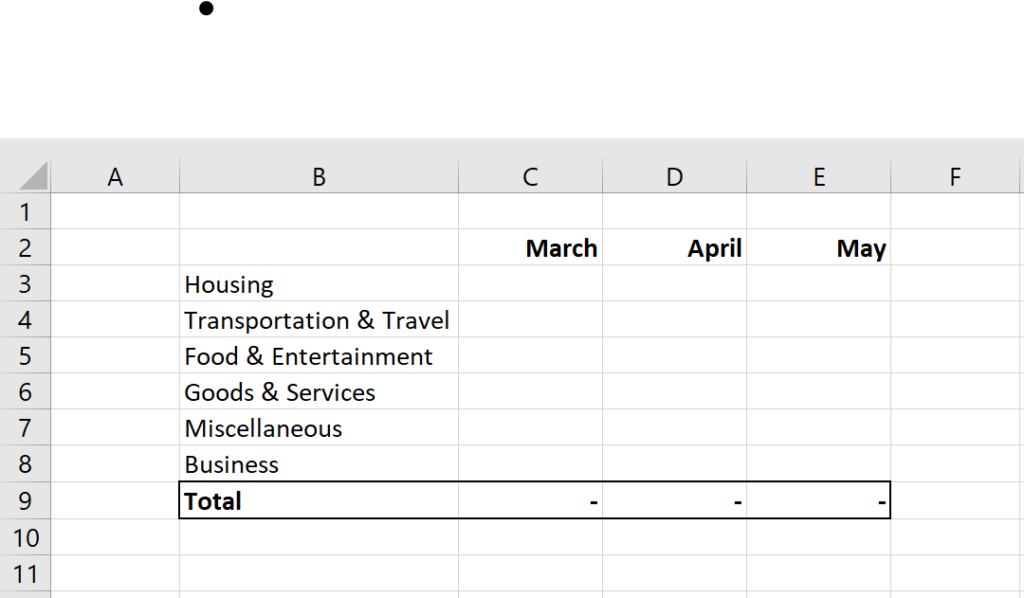
With a simple SUMIF function, you can quickly calculate each category’s total across each month. Here’s the formula:
=SUMIF(range, criteria, sum range)
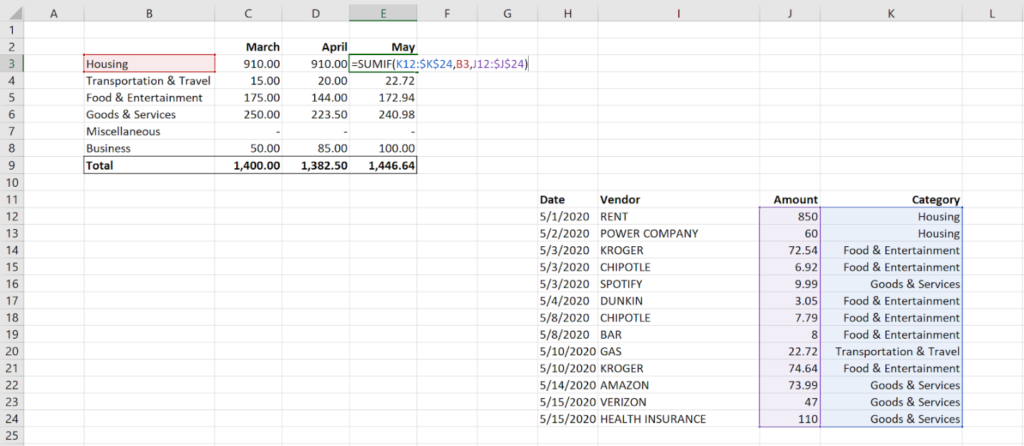
For your budget, your range will be your labels (like “Housing” or “Transportation & Travel.” Your criteria will be the specific label you want to calculate. Your sum range will be the transaction amounts.
Let’s walk through an example. To calculate May’s Housing expenses (cell E3 in the image above), you would…
- Type “=SUMIF(”
- Select your range, which are your categories for May’s expenses
- Select your criteria, which is cell B3 or “Housing”
- Select your sum range, which are your amounts for May’s expenses
- Hit enter
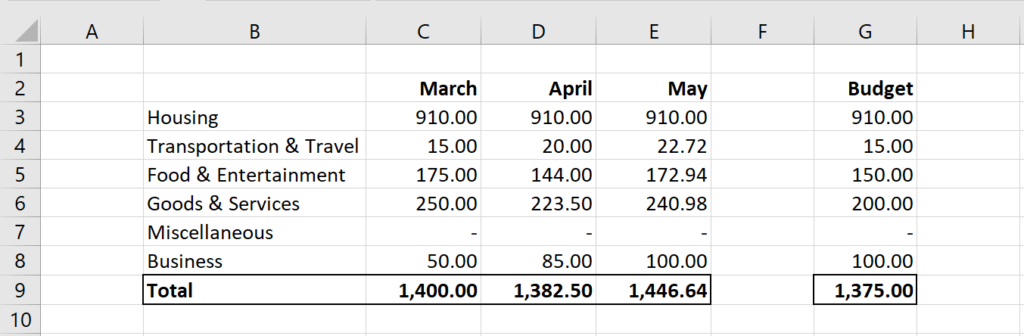
You’ll follow this approach for each cell in column E. Here’s what this looks like in one sheet. (The numbers for March and April are just for illustration.)
DIY Budget Step #4: Set thresholds
Now that you have an idea of your spending habits, it’s time to decide how much you want to spend on each category each month.
Everyone has different spending habits, so there isn’t a universal budget. Yours should be tailored to your needs and preferences.
Base your budget limits on either (1) your average spending or (2) percentages of your income.
If you haven’t established stable freelance income yet, use your average spending over the last three months as a guide.
Using our previous example, you could create category limits based on rough averages of your spending habits.
For instance, even though you spent $170+ in March and May, you know you can spend below $150 – so you decide to use that as your limit.
You might need to spend a few months tinkering to figure out what limits you’re able to live within. Playing around with numbers in a spreadsheet is different from enforcing these limits in real life.
The goal is to give yourself the best possible chance to build your business. To do so, you might need to bootstrap until you earn a consistent income.
That being said, you won’t be perfect. It’s just not possible.
Budgets are guides, not strict laws. Don’t beat yourself up if you’re a little over your budget every now and then.
It happens. We’re human.
Option #2: Budgeting Tools
The main purpose of a budgeting tool is to simplify the budgeting process and provide a transparent summary of your spending and saving capabilities.
If you’d rather use a digital platform to track your monthly expenses, there are plenty of options, including…
- Mint
- YNAB
- Goodbudget
Forewarning: Most budget apps will want to connect with your bank accounts. If you’re hesitant about sharing personal financial data online, you might want to make your own budget.
Budgeting Tool #1: Mint
Mint is Intuit’s free personal finance tool. At its core, Mint is a budgeting app, but it also helps you track your net worth and manage bills.
Once you link your bank accounts, Mint will automatically categorize each of your transactions.
You can enable alerts so that Mint will notify you when you reach your budget limits or when a bill is due.
Budgeting Tool #2: YNAB
YNAB uses the zero-based budgeting technique, which allocates every dollar of your monthly income. Unlike Mint and Goodbudget’s basic plan, YNAB isn’t free.
It costs either $11.99 per month or $84 per year. But it does have additional features like goal-planning and personal support via free classes and guides.
Budgeting Tool #3: Goodbudget
Goodbudget is a digital spin on the envelope budgeting technique, which uses paper envelopes to sort and limit monthly expenses.
For example, if you want to budget $400 for groceries, $800 for rent, and $100 for entertainment, you’d physically put these dollar amounts in paper envelopes.
Goodbudget is based on the same system, except you track your “envelopes” on your computer or phone. Goodbudget offers two plans: basic (free) and plus ($7 per month or $60 if you pay for an annual subscription).
Is it better to build your own budget or use a budgeting app for your freelance finances?
Personally, I prefer the DIY budget, which helped me cut my monthly expenses by 32%.
The initial setup will take you between 15 and 30 minutes. Beyond that, all you have to do is plug in numbers each time you update your budget.
It provides you total freedom to manipulate and organize your finances.
On the other hand, budget apps can be cumbersome and costly.
In my experience, they tend to mislabel transactions, so it’s not as much as a time-saver as you’d think.
3. Saving and Investing
The first two pillars of freelance finances, invoicing and budgeting, make saving a much easier process.
Your invoices track your income, and your budget tracks your business and personal expenses, so you can easily calculate your net income (income minus expenses) every month.
Your first inclination might be to calculate your monthly income based on work delivered, but there’s a better route to take.
Instead, your income for any given month should be based on paid invoices.
So, if you collected $2,000 from paid invoices in April, but delivered $3,000 that same month – your April income would be $2,000, not $3,000.
This is known as cash basis accounting, which recognizes revenue and expenses when cash is received or paid.
As a freelancer, you may have multiple clients with different payment terms (e.g. net-15, net-30).
Plus, each client’s timeliness will vary too. A rare few will pay early, some will pay right on time, and others will be late (and make an annoying habit of it).
Let’s look at an example.
In the table below, you’ll see a list of invoices for three clients between March and May. Clients A, B, and C pay on different days.
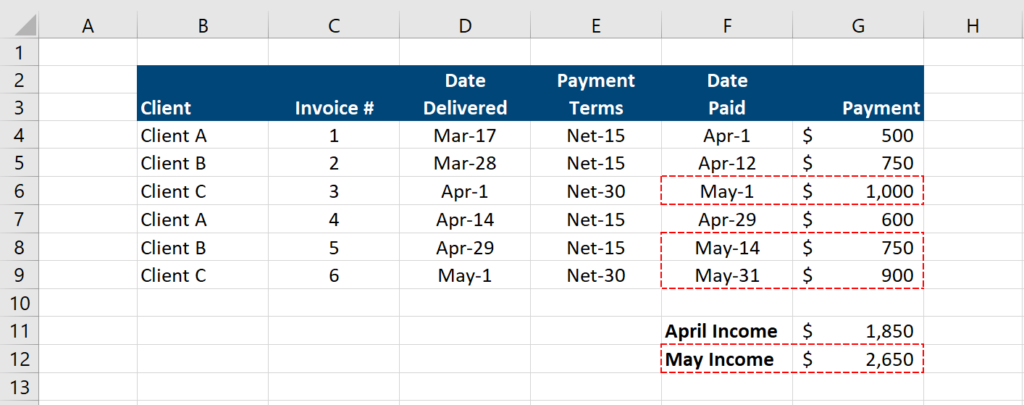
Client A and B have net-15 terms while Client C has net-30 terms. Based on when these invoices are paid (not delivered), May’s income is $2,650 even though most of this work was delivered in April.
Since your cash inflows are sporadic, you need to schedule saving into your monthly schedule.
To make things simple, pick a day of the month (like the fifth day or the first Tuesday, whatever you’re feeling). That day will be your finance day.
On this day, you’ll consolidate your paid invoices to figure out your income (you can use the same format as above), update your budget for the previous month, and then calculate your estimated taxes and savings.
…Yep, I said that horrifying word: taxes.
Remember, in most cases, freelancers receive untaxed income.
But you still owe taxes to the government. You can’t just bank all of your income and expect the IRS to let that slide.
As a self-employed business owner, you’re responsible for your business’s tax payments.
These payments are due each quarter. The deadlines are the pretty much the same every year (except 2020, but that’s an anomaly):
- Payment #1 is due April 15, which covers income earned January 1 through March 31
- Payment #2 is due July 15, which covers income earned from April 1 through May 31
- Payment #3 is due September 15, which covers income earned from June 1 through August 31
- Payment #4 is due January 15, which covers income earned from September 1 through December 31
You’ll need to set money aside for these payments to avoid putting yourself in a bind.
How much should you set aside for taxes as a freelance business owners?
Between 25% and 30% of your taxable income, which is your income from paid invoices minus deductible business expenses.
But the good news is:
There are tons of deductions, and you probably qualify for more of them than you think.
For example, if you have a designated home office, a portion of your housing expenses can be a tax deduction (based on the square footage of your office versus your home).
The same goes for Internet bills, phone bills, insurance bills, gas (if you meet with clients in person), and so on.
Taxes are subjective, so I recommend speaking with an accountant for personalized tax advice and calculations.
But, for the sake of setting aside a rough estimate, you can subtract your business expenses from your business income to calculate your taxable income.
Remember how business expenses should be separate from personal ones? This is why.
Once you calculate your taxable income, you’d take 25% (or 30% if you want to be more conservative) of this amount and put it in a high-yield savings account.
This will be your “tax savings” account. You’ll use it to pay tax estimates.
Combining our examples, here’s what May’s net income would be:
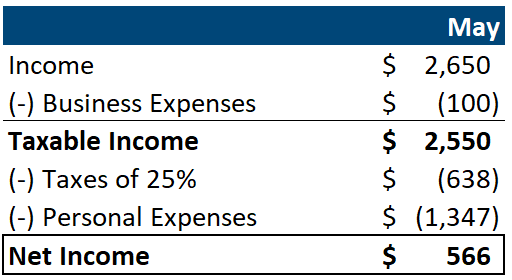
Now that you know your net income, you know how much money you can set aside for savings.
But saving is a general term.
How and where should you save your money? When does investing come into play?
Your savings shouldn’t be random – because saving money, by itself, is not enough. You should have an actionable plan for your money.
Far too many people hoard cash in their checking account and miss out on interest income and investment gains.
It’s a common (and costly) mistake. So, let’s outline a savings plan.
Savings Plan for Freelancers
Everyone, freelancer or not, should have a financial infrastructure that helps meet their needs and goals:
- Immediate needs: general monthly expenses, such as rent, groceries, credit card bills, clothing, Netflix, etc.
- Unexpected needs: unpredictable events like car accidents, broken bones, or job loss.
- Near-term goals: any significant purchase or event that you expect to happen in the next fifteen years. Buying a house or car, backpacking across Europe, saving for kids, paying for a wedding, etc.
- Long-term goals: anything beyond 15 years, mainly retirement.
Your financial infrastructure should consist of…
- Checking account for your immediate needs. Since these are regular and mostly predictable needs, you’ll use a checking account to pay for them. Keep no more than two months of expenses in your checking account.
- High-yield savings account for your unexpected needs. You can’t predict them, but you can be financially prepared for them with an emergency fund. An emergency fund should be kept in a high-yield savings account and hold roughly three to six months of expenses. ONLY USE THIS MONEY FOR EMERGENCIES.
- Brokerage accounts for your near-term goals.
- Retirement account for your long-term goals.
Once you’ve funded your checking and high-yield savings accounts, only then can you focus on your goals.
Since your goals are unique to you, there isn’t a universal dollar amount to shoot for.
If you don’t have set timelines for your goals yet, you can simply split your savings 50/50 between near-term and long-term goals.
For instance, if you have $1,000 of savings in a particular month, you could allocate $500 to a brokerage account and $500 to a SEP-IRA.
4. Reinvesting in Your Freelance Business
Can a flower grow without water?
The answer to that obviously redundant question is no.
For flowers to bloom and thrive, they must be watered. This basic concept isn’t just for botanists – it applies to freelance writers too.
If you want to grow your business, you need to reinvest in your business.
So, what exactly should you spend money on to grow your business?
We can simplify your reinvestments into two categories:
Learning and outsourcing.
“Learning” can be defined as anything that teaches you more about business-related subjects.
For example, Jorden’s Killer Cold Emailing course can sharpen your cold pitching skills so that you can land more gigs.
Outsourcing is another way to stay ahead.
As a business of one, you have a lot of responsibilities – like marketing, corresponding with clients, managing finances, and, of course, writing.
Once you earn enough money, you can afford to invest in outsourcing more of these responsibilities.
For example, you could invest in…
- Accounting software (like FreshBooks) to streamline your finances
- Editing software (like Grammarly) to fine-tune your content
- Social media software (like Buffer) to automate your social media profiles
- Virtual assistants to manage the tedious admin work that we all know and love (not)
- Graphic designers to handle the visuals of your content
It helps to view reinvesting in your business from an ROI perspective.
In other words, you need to ask yourself:
“Is the cost of the investment worth the return?”
For example, investing $200 in a copywriting course might sound pricey – but think in terms of how long it takes you to earn that money back.
One $200 copywriting gig later, and you’ve not only recouped your investment – you’ve set yourself up to land even more!
You can apply this thought process to most worthwhile investments.
Paying $30 a month for accounting software isn’t so bad when you factor in the amount of time it saves you.
Purchasing a domain for $100 is an easy decision when you consider all the clients a website can attract.
It’s easier to justify the price tag when you break it down into tangible, applicable results.
How much you reinvest in your business depends on your budget. As your income increases, you’ll have more room in your budget for learning and outsourcing.
One Final Thought on Freelance Finances
One way or another, you need to manage your freelance finances. How you do that is totally up to you.
BUT, if you’re new to freelancing and/or finance, it might make more sense to outsource the harder financial responsibilities (like using accounting software for bookkeeping or hiring an accountant for your taxes).
It alleviates some of the stress of running a business – plus, it gives you more time to write.
Last, but not least, keep your eyes on the prize. Remember why you’re organizing, structuring, and taking control of your finances:
To turn your passion into a money-making machine.
Carter Kilmann is a freelance copywriter and editor for hire. When he’s not writing for clients, he’s writing about finance, entrepreneurship, and psychology on Medium. Follow him on Medium @carterkilmann for more content.